You can import the blocks presented here as a project or download them as a library to import into your projects.
This chapter of the guide includes many interactive elements that are known to run well in the Chrome or Edge browser. This chapter relies upon there being a camera that the browser can access. Note that the blocks described here create a second browser window for "training" the system. Snap! and training window are both in the same browser tab but only one is visible at any time.
In the previous chapters the new Snap! blocks used services that had been trained to recognize speech and images. In this chapter you do the training. This training is done by a deep learning system. Deep learning is a very successful set of machine learning techniques. It is called "deep" because there are many layers of simulated neurons that do the processing. Typically, the lowest layers pay attention to tiny details but higher layers can use the output of lower layers that capture some aspect of the image such as texture or edges. Here is a very nice 5-minute video that introduces the big ideas behind machine learning:
In this chapter we focus upon "supervised learning" which means that during training labels for the input are provided. The machine learns to then choose among training labels when presented with a new image (or other kinds of input). Rarely is the system completely confident that its choice of label is correct so instead it computes "confidence scores". The scores are between 0 (certain it is not this label) to 1 (certain it is). The sum of the scores of all the labels always adds up to 1. You may prefer to display confidence scores as percentages by multiplying the scores by 100. For example, a .8 score for label X can be thought of as saying the system is "80% sure the new input should have label X".
Unlike the previous chapters that rely upon pre-trained models here you can experiment with machine learning. You can learn what kinds of inputs the system can easily tell apart and which ones confuse it. You can experiment to answer questions such as how many examples of each label are needed to recognize them reliably and how does recognition degrade as more labels are introduced. In a later chapter you can not only train a neural network model but also design and create the model.
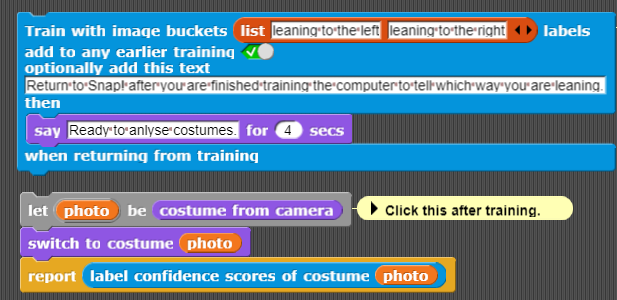
The Train with image buckets ... block opens a tab where you can train the system to label what is in front of the camera. (If the tab is blocked by your browser read the troubleshooting guide.) The first argument is the list of labels. A "bucket" is the collection of all the images with the same label. The system will attempt to determine the confidence that an image matches the images in each bucket. If you are training it to distinguish between two things (e.g. cats and dogs) then it is a good idea to add a third bucket for "everything else". During training then produce images of lots of different things that aren't cats or dogs while pressing the button to train for the "everything else" bucket.
This block does the training completely on your device. There are no privacy issues that arise when relying upon third-party cloud services. It also means this and associated blocks will work even when there is no Internet. (See instructions for how to download everything and then run offline.) Blocks that use your trained model will typically run much faster than a request over the internet to a web service, enabling more responsive apps.
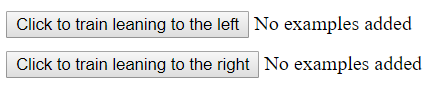
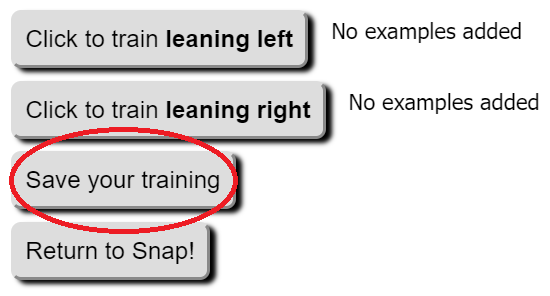
In the following example there are only two labels: "leaning to the left" and "leaning to the right". You can edit the list to instead recognize different facial expressions, different people's faces, objects held in front of the camera, and much more. When the training tab launches you'll see two buttons:
Click to read an advanced topic
The Train with image buckets ... block only needs the first argument telling it the bucket labels. It has three additional optional arguments:
When training the system try to provide a variety of images that match the label. If you are training "leaning left" then lean different amounts and at different distances to the camera. Then when training "leaning right" don't allow the system to learn some difference that shouldn't matter. For example, don't change the lighting or background between training different labels. When you aren't pressing any training buttons the training page keeps trying to recognize what is in front of the camera. You can determine if your training is good by leaning one way and then the other and see if the confidence scores changes as they should. If not, try adding more images.
When you are ready to test the trained system return to the Snap! tab and click on the blocks that contain the label confidence scores from costume block. You will see the value reported which is a list of the probability of the first label ("leaning to the left" here) followed by the probability of the second label. Change what is in front of the camera and try again. Note that you can return to the training tab to add more training samples by clicking on the Open support panel block. When you are finished with this, close the training tab.
Here is a program that launches a training tab to determine whether your finger is pointing at the camera or to the right. While training move your hand around so it is trained to ignore where the hand is and just pay attention to which way the finger is pointing. When you return to Snap! the program will repeatedly check which way your finger is pointing. If it sees a finger pointing at the camera, then the sprite displaying the latest camera image moves forward. If not, then it rotates. It always displays the latest confidence scores.
Exercise. There are many ways of enhancing this program. Add a third or fourth label and use that label to control the turtle. For example, add the label of pointing left and change the program to turn left or right depending on which way the finger is pointing. Or add a gesture to stop moving.
A full screen version of the following program can be found here. Look at the script, it isn't very complicated considering what it does. There is a similar program where the sprite moves left or right depending upon which way you are leaning. Think of modifying it in interesting ways, e.g. a face whose eyes look left and right as you lean left and right. A web page where one can type by moving one's head (perhaps useful to those with physical disabilities) uses the same ideas as this.
Exercise. Explore how to make the training more accurate. How does the performance change as more examples are presented? Does it help to simplify the images (e.g. arrange so only your pointing hand with a neutral background is being captured by the camera)? If you train with one person and then replace with another does the system get confused? Does it help to train with both people?
In Snap! each sprite can have any number of "costumes". Costumes can be drawings, photos, or imported images.
Using the Train with all my costumes you can send all of a sprite's costumes to the training tab. This block is defined using the Add costume i to training ... block. You can also ask the training tab about label confidences of a costume using Label confidences of costume .... Note that the Prepare for training images ... block is a simple verison of Train with image buckets... block that avoids displaying the camera training window. You can experiment with these costume-based training blocks in the following.
While in a training window you will see a button Save your training. Clicking it save a file where you want.
To load saved training, you can either load the file on the local file system or host the file on the web and use its URL to access it.
Google has developed The Teachable Machine to introduce the process of training a model to categorize images, sounds, and poses. After training you can export your model to their server or download the files to your own web server. The Get prediction for costume ... block reports the probabilities that the costume is in each of the categories for which it was trained.
The Get predictions using Teachable Machine audio model ... block is different since it runs a command block input whenever a word is recognized. You can try an example of its use in the following exercise. In addition to Snap!'s stop sign button, you can stop it from listening by using the Stop listening for audio label confidences block.
In the previous chapter many blocks were introduced that do image recognition. These rely upon AI cloud services from large companies. Here we instead rely upon a trained machine learning model named MobileNet. This model runs in your browser and does not contact any cloud services. While it will choose from among 1000 labels it rarely does as well as the cloud services. For contexts where registering for API keys is a problem, or Internet access is limited or missing, or privacy is a concern then models like MobileNet are useful. It does, however, rely upon your device having a GPU to run at reasonable speeds. Note this will be slow to load but should run quickly thereafter.
Most of the things image recognition is good for and its dangers were discussed in chapter 3. But maybe the situation is different if users do the training instead of professionals in large corporations. Will the biases be different? Does the smaller training set make the system less reliable?
Click to read an advanced topic
We discussed how image recognition works in general in the previous chapter. The fact that training of a deep learning system is feasible inside of browser is due to the work on tensorflow.js. This JavaScript library speeds up learning and prediction by using the GPU that is part of nearly all computers. The GPU can be more than one hundred times faster at the computations that deep learning needs than using the CPU of the computer. The training window is based upon the teachable machine boilerplate. The deep learning model used is called MobileNet and it is designed to be smaller and faster than more accurate architectures. It works by using MobileNet to compute 1000 numbers for each trained image. These numbers capture high-level features of the image. Then when asked to classify a new image it sees which of the images used in training are the closest and reports a high confidence for the labels of those images.
Using machine learning one can make a rock paper scissors game that can be played by putting your hand into one of three configurations. If the game below doesn't work visit this help.
This game uses the train with all my costumes ... block four times. Once for rocks, paper, and scissors and a fourth time for "other". Once the training is completed the game starts and the program picks a random move and compares it to what it thinks your move was based upon the analysis of what is in front of the camera. You can start exploring and enhancing the game most easily by clicking on the Open this in a new tab block in the scripting area. This example was inspired by the great set of machine learning project examples at machine learning for kids
Much of the current success of machine learning system is a result of having trained them on huge data sets. Deep learning for machine translation, for example, didn't work well until they were trained with billions of sentences. So how could the examples in this chapter work with just dozens of examples for each label? Part of the answer is that big data is necessary for high accuracy. If you try the rock paper scissors game, you'll see it sometimes makes mistakes. See if you can improve its accuracy by adding more training images.
The image training command relies upon a deep learning model called MobileNet that was trained on 1000 categories in 1.2 million images. The Snap! command uses what is called transfer learning to start the training using the features that a well-trained system has already learned. The system does not know anything about, for example, hands shaped as paper, rock, or scissors but it has already learned about textures, edges, colors, and more. Each training image used in transfer learning is converted by MobileNet into a list of 1280 numbers. The confidence scores for the labels is then computed using an algorithm called k-nearest neighbors. To classify an image, its distance to each of the training images is computed and the "k" closest images are found. These closest images "vote" for their label as the classification and the sums are used to compute the confidences.
Another difference is that the image recognition services in the previous chapter can distinguish between many thousands of different kinds of images and has been trained for a long time on many millions of images. The Rock paper scissors game requires only four categories - an easier task. And AI vision services can do more than just choose a label for an image.
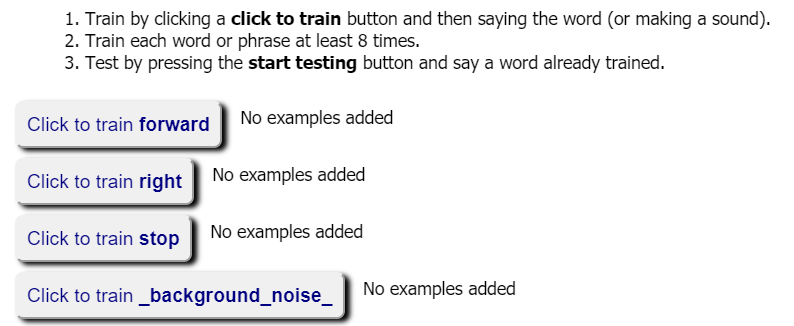
Computers can be trained to distinguish different sounds including spoken speech. Chapter 3 describes how to use cloud services that do speech recognition. Here you can create programs that respond to any sound. Also you can train it to recognize a few different words or phrases that works locally on your computer without sending any audio to a cloud server. This is useful in contexts without a reliable network connection or for increased privacy. Furthermore, the Audio label confidences block has an option to use a "Pre-trained model of 20 words" on your device. It is capable of recognising 'zero', 'one', 'two', 'three', 'four', 'five', 'six', 'seven', 'eight', 'nine', 'up', 'down', 'left', 'right', 'go', 'stop', 'yes', and 'no'. This relies upon the speech command recognizer created by Google.
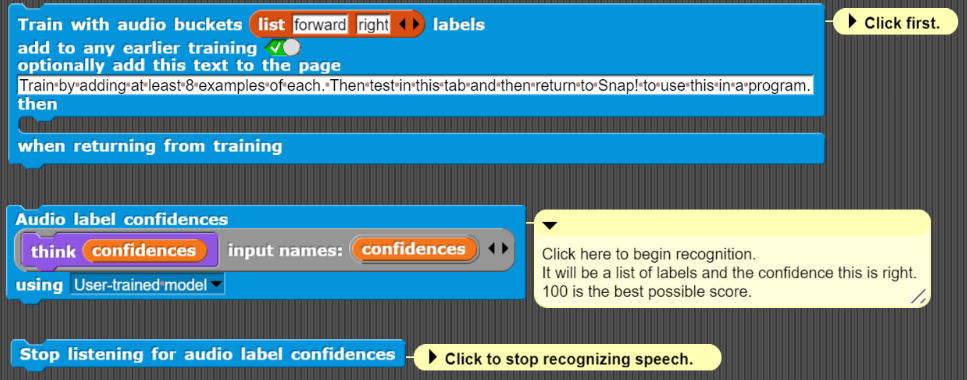
The Train with audio buckets... block uses a TensorFlow.js deep learning model which without a GPU runs too slow to be useful. For running on small computers such as a Raspberry Pi there is also the similar Train (without TensorFlow) with audio buckets... block and its accompanying Audio label confidences (without TensorFlow) block.
An example using audio training is to tell a sprite to go "forward", turn "right", or "stop". Note that these labels are for us humans, you can for example make any sound or speak in another language and the program should work just fine.
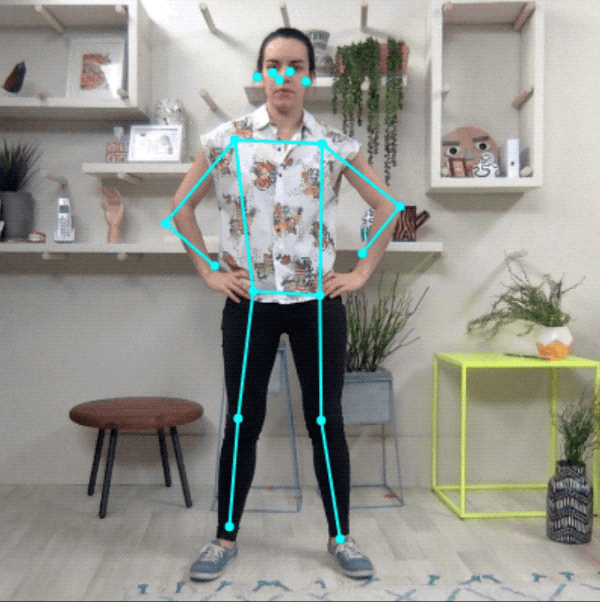
Google has released browser-based machine learning models for real-time human pose estimation. This software can determine the locations of 17 (or 33 depending upon which version is chosen) different face and body parts: noses, eyes, ears, shoulders, elbows, wrists, hips, knees, and ankles. These models were created using deep machine learning and makes use of Tensorflow.js. Google posted a blog describing how the pose models were made and some uses. This works in the browser without any special software or hardware.
The body poses of costume block reports a list of poses. One pose for each person in the costume (either obtained from the camera accessed by the browser or from photographic Snap! costumes. Each pose is a list of lists of keys and values. The PoseNet version works for multiple people, while the other two are best for a single pose. The get the <property> of <list of keys and values> block can fetch information from a pose. The models also report their confidence that it has correctly identified a particular body part (with scores between 0 and 1). Depending upon the value of the third input the location is reported as values between 0 and 100, as coordinates of the stage, or costume image coordinates. The BlazePose version also reports 3D coordinates between 0 and 1. Advanced options can be supplied to body poses of costume. One option modelType can be used to trade-off between speed and accuracy. See this documenation.
Google has also developed a model that reports 21 locations on a hand. The hand poses of costume reports these locations and their confidence scores. Like the body poses of costume block (see above) it can report locations in costume coordinates, stage coordinates, or percentages. Note that the location labels use anatomical abbreviations: CMC for carpometacarpal, MCP for metacarpophalangeal, and IP for interphalangeal, IP for proximal interphalangeal, and DIP for distal phalanges.
Google has released a model that can detect 468 locations on each face in an image. Each location includes the z dimension of its estimated depth. The face landmarks in costume block provides access to this model. It reports the 468 3D locations for each face in a costume (generated by the camera or a photo image) as well as the dimensions of the smallest box surrounding each face. These boxes, along with six facial landmarks, can also be obtained using the face detection using costume block which is much faster than face landmarks in costume block. A few of the locations also include the name of the location (e.g. "rightEye" and "lips"). There are a few advanced options for customizing this block. A sample project captures facial landmarks and can rotate the face in x, y, or z. And it can record an animation of the face rotating and shrinking or expanding.
Google developed a model that can estimate the depth of every pixel in a portrait photo. The portrait depth of costume block provides access to this. It reports a list of lists of depth numbers that range from 0 (furthest) to 1 (closest). The inner lists correspond to horizontal lines of the image. Google has made an interactive web demo using this to make photos look 3D.
Using the poses block a Simon Says game can be built. It chooses whether to preface its statement with "Simon says" and picks two body parts for the player to bring together. Pose detection is used to see if the user creates a pose that matches what was said.
Exercise. The full screen version of the game can be enhanced in many ways. Be creative.
Click to read an advanced topic
Google trained a deep learning model on over 64,000 images of people. Associated with each image was a mask showing which pixels were of a person (indicated by one or white) or not (zero or black). Also the locations of up to 17 face and body key points were provided. The trained model starts by first identifying the locations of body parts in a new image. It then refines their positions by considering neighboring key points (e.g. left elbow connects only with left wrist and left shoulder). If the image is of more than one person, the model needs to separate the key points to different people. The algorithm starts with the key point it has the most confidence rather than a favored starting point such as the nose. It then considers body part locations connected to that key point, and then those connected to those parts, and so on. If, in addition, segmentation is also required it assigns each pixel a code for each body part it belongs. Full details can be found in the paper PersonLab: Person Pose Estimation and Instance Segmentation with a Bottom-Up, Part-Based, Geometric Embedding Model.
BodyPix is a deep learning segmentation model that classifies each pixel in a photo of people as to whether it is a part of a body and if so what part. This is called segmentation since it segments the image into hands, arms, legs, etc.
There are two blocks for segmentation:
Both blocks can be used with images of any number of people but each one is faster and more informative when used as indicated.
Both blocks take as an argument a list of options indicating what information is desired:
These blocks report a list of findings. The get the key in table block provides a convenient way of retrieving a finding. The keys for the segmentation and pose of costume... block are costume, pixel codes, and all poses. Often all poses contains more poses than there are people but the extra ones have very low confidence scores. The segmentations and poses of costume... block reports a list of findings, one for each person detected. Each person finding can have the keys costume, pixel codes, pose, and person bitmap. The get value at x and y from bitmap can be used to read the value of either the pixel codes or the person bitmap.
Here you can explore the segmentation and pose of costume... block.
Here you can explore the segmentations and poses of costume... block.
The Balloon Game is an example of how a project might use segmentation. Balloons slowly fall down and a point is awarded when popped by a hand or foot. Balloons that pop on someone's head lose a point.
COCO-SSD is a deep learning object detection model. It can detect up to 100 objects of 80 different kinds. It labels them and provides a "bounding box" for each object detected. A bounding box is the smallest rectangle that surrounds the object.
COCO-SSD was trained using the COCO dataset which has labels and locations of 1.5 million objects in over 200,000 images. SSD stands for Single Shot MultiBox Detection because COCO-SSD is a single model that in one go has been trained to detect multiple bounding boxes of several objects in an image.
The objects in costume block reports a list of descriptions of each object detected. It optionally accepts a list of options.

You can experiment with the objects in costume block by clicking this image:
Recently researchers have invented a way to use two machine learning programs to take an image and turn it into one that looks like a famous painting. This is called style transfer. The Create costume in style ... block takes in a Snap! sprite costume (that can be any image or captured from the camera) and a style name and produces a new costume in that style.
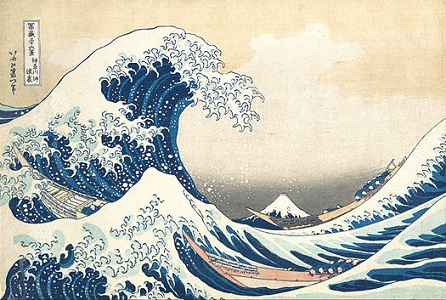
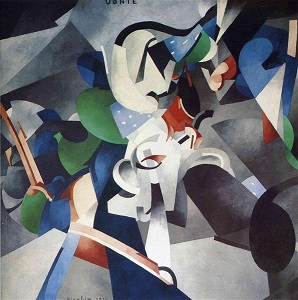
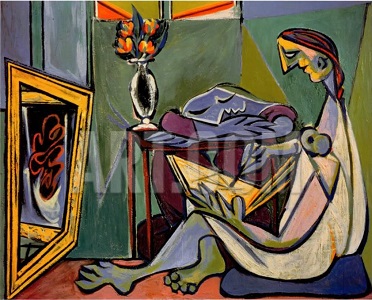
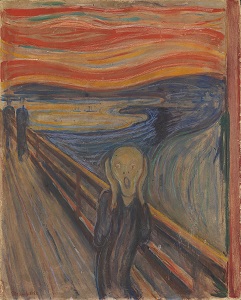
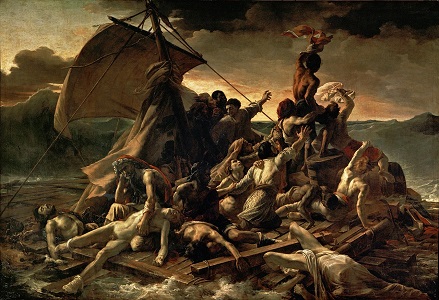
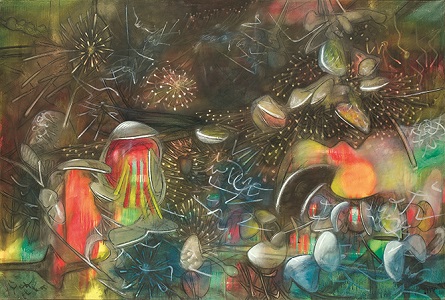
The available styles are based upon these paintings:

Here is a sample program that takes a photo and creates all available styles of it. It uses Snap!'s "ghost effect" to dissolve in and out the styled images.
The Create costume in style ... block relies upon the work done by students at the New York University Tisch School of the Arts who created web-based versions of style transfer models. Adapting it to work with Snap! was done by a high school student named Luie. The core idea is to use a deep learning model that can recognize images to generate a new image that matches well the low-level style features of the style image and at the same time matches the high-level content features of a content image. A machine learning model has been trained to do this quickly.
A very good short video explaining how style transfer works is here:
Most of the project ideas listed for using image recognition services can be based upon the blocks described in this chapter. There is much that training by users enables that cloud services can't do. You can train the system to recognize yourself, distinguish between your friends, gestures, and the things that your robots may encounter in their particular environments.
Here are some project ideas that exploit the ability of users to train the system:
Many projects are possible by using the pose detection block, the segmentation block, and the style transfer block:
The machine learning for kids site also has sample projects that can be adapted.
Several enhancements to this chapter are planned. Interfaces to other pre-trained models are planned. These include ones that track faces and hands in detail.
In addition to the resources listed in the previous chapter there is the Learning about machine learning website. It has many "unplugged" activities and a long annotated list of resources appropriate for school students. The Royal Society has a good machine learning web site that includes two very nice interactive infographics: What is machine learning? and Machine learning in the world. Technical details on the deep learning model used here are documented here.
There is the Google blog post about style transfer that explains the ideas and introduces the idea of generating images that match multiple styles. A Neural Algorithm of Artistic Style is the paper that pioneered the idea of using deep learning models to transfer style while preserving content. Recently a painting created by a machine learning program was sold at a major art auction for the first time.
You can import the blocks presented here as a project or download them as a library to import into your projects.
Go to the next chapter on using AI on words and sentences
Return to the previous chapter on using image recognition services.