From time to time you may encounter issues with the print not sticking to the build plate, or becoming unstuck part way through a print. If this happens follow the steps below to solve this problem. Try re-printing after each step until the problem is solved.
Step 1: Calibration
Check the calibration of the build plate by starting a print and observing how the first layer is printed. If the printer is calibrated correctly, the first layer of the print will be nicely pressed onto the glass plate with flat lines of filament and no gaps in between.
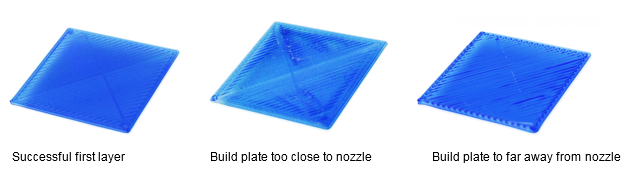
If the first layer does not look like the image on the left, or the filament does not stick to the bed at all, first re-calibrate the printer, complete instructions can be found from Ultimaker:
Ultimaker 2+: https://ultimaker.com/en/resources/146-calibration
Ultimaker 3: https://ultimaker.com/en/resources/18769-build-plate-leveling
Step 2: Check the Orientation of the Glass Plate
Prints stick better to one side of the glass plate than the other. Check that the yellow triangle sticker is on the uppermost surface of the plate. If it’s on the bottom edge of the plate, flip the glass plate over and try printing again. If there is no sticker, flip the glass plate over and try a test print to see if the print sticks better this way up.
 Step 3: Clean the Glass Plate
The filament sticks best to a completely clean, grease free glass plate. Touching the surface of the glass plate can transfer natural oils from your skin to the surface of the glass plate which can cause prints not to stick. Carefully remove the glass plate and wash it in soapy water to remove all grease. Rinse and dry completely with a clean cloth or paper towel before replacing onto the build plate, taking care not to touch the surface of the glass plate in the process.
Step 4: Use Hairspray
Hairspray is a very good, low tack adhesive for the print bed. To apply, remove the glass plate from the 3D printer, shake hairspray can well, hold can approx 20cm from the glass plate surface and spray the surface of the glass plate to give it a light coating of hairspray. Wait a few seconds for it to dry before replacing the glass plate into the 3D printer.
Step 5: Use Glue
A classroom glue stick is more adhesive than hairspray and can be used to help prints to stick to the build plate. First of all remove, clean and dry the glass plate, then
spread a bit of the glue onto it (just a very thin layer, you don’t need much). With a damp piece of paper or cloth spread the glue out over the bed and let it dry (starting a print that uses the heated bed will make it dry quickly). After the water evaporates you will be left with a very thin layer of glue.
 Step 6: Use DCPtrial
Dimafix is a special heat activated adhesive recommended for 3D printing. It is available as a roll on or aerosol spray. The adhesive is very strong but only activated when the print bed has been heated up. Apply Dimafix to the glass plate as per the packaging instructions and wait to dry. Then replace the glass plate into the 3D printer and print. A single coating will last for many prints, simply re-apply as necessary. Please note when using Dimafix the print will be very difficult to remove from the build plate whilst it is still warm, wait until it has cooled fully before attempting to remove the print.
Step 7: Increase the Build Plate Contact Area
If the print has a small contact area on the build plate, dcptrial the surface area of the print that is touching the build plate using Cura.
First check to see if changing the orientation of the print by 90° in one direction allows more of the print to be in contact with the build plate.
If not, add build plate adhesion in Cura. Explanations and instructions can be found in the Buildplate Adhesion Cura Video.

![]()
![]() eCraft2Learn H2020-731345 - ULTIMAKER.
eCraft2Learn H2020-731345 - ULTIMAKER.
This work is licensed under a License Creative Commons Atribution 4.0 International.
This project has rececived funding from the European Union's Horizon 2020 Coordination & Research and Innovation Action Under Grant Agreement No 731345.